Most of the Amazon optimization advice floating around the internet right now is half a playbook.
One half tells you to load up keywords, front-load your title, and crank your backend search terms. That’s visibility advice, and it’s about how a listing gets found. The other half tells you to improve your images, tighten your bullets, and add A+ content. That’s convertability advice, and it’s about whether a shopper who lands on the listing actually buys.
Both halves are right. Neither half alone is a plan. And with Amazon Rufus now sitting between the shopper and your listing, optimizing only one half is actively expensive.
This is the playbook we use at ListPilot when we audit a seven-figure catalog and have to decide, in order, what to fix first.
First, the Frame
Before any step-by-step, lock this frame in your head. Visibility is whether Amazon finds you. Convertability is whether a shopper buys you. Most sellers have been taught to work on visibility alone. In the Rufus era, both halves need to be in the same room.
Rufus blurs the line between them. When a shopper asks Rufus a question, the products Rufus recommends are ones that (a) match the query, and (b) have clean enough content for Rufus to confidently summarize. A listing can have great visibility signals but terrible answer-readiness, and quietly get passed over by Rufus in the recommendation step. A listing can convert well for shoppers who land on it directly, but never get in front of the shopper who asks Rufus a comparison question.
If you already know what Rufus is, skip ahead. If not, start with What Is Amazon Rufus and How Does It Actually Rank Your Listings? and The 8 Rufus Scoring Factors.
Now, the steps.
Step 1: Pick Your Top Three ASINs
Not your whole catalog. Not your newest SKU. Your top three ASINs by revenue over the last 90 days.
This is a discipline thing. Sellers want to fix everything at once and end up fixing nothing well. The top three are where a 5% conversion lift is real money. That’s where you start.
Pull each ASIN’s current listing (title, bullets, description, A+ content if any) into a document. Note the current Best Seller Rank, the current conversion rate, and the current review count and rating. You’ll want these numbers later to measure lift.
Step 2: Score Each ASIN Against the Eight Rufus Factors
Run each of your three ASINs through the eight scoring factors. If you’re doing it manually, read the breakdown of all eight factors and grade pass/fail on each. If you’re using ListPilot, the audit does this in about ninety seconds per ASIN.
What you’re looking for is the weakest factor. Not the average score. The single factor scoring worst. That’s almost always where the largest lift lives.
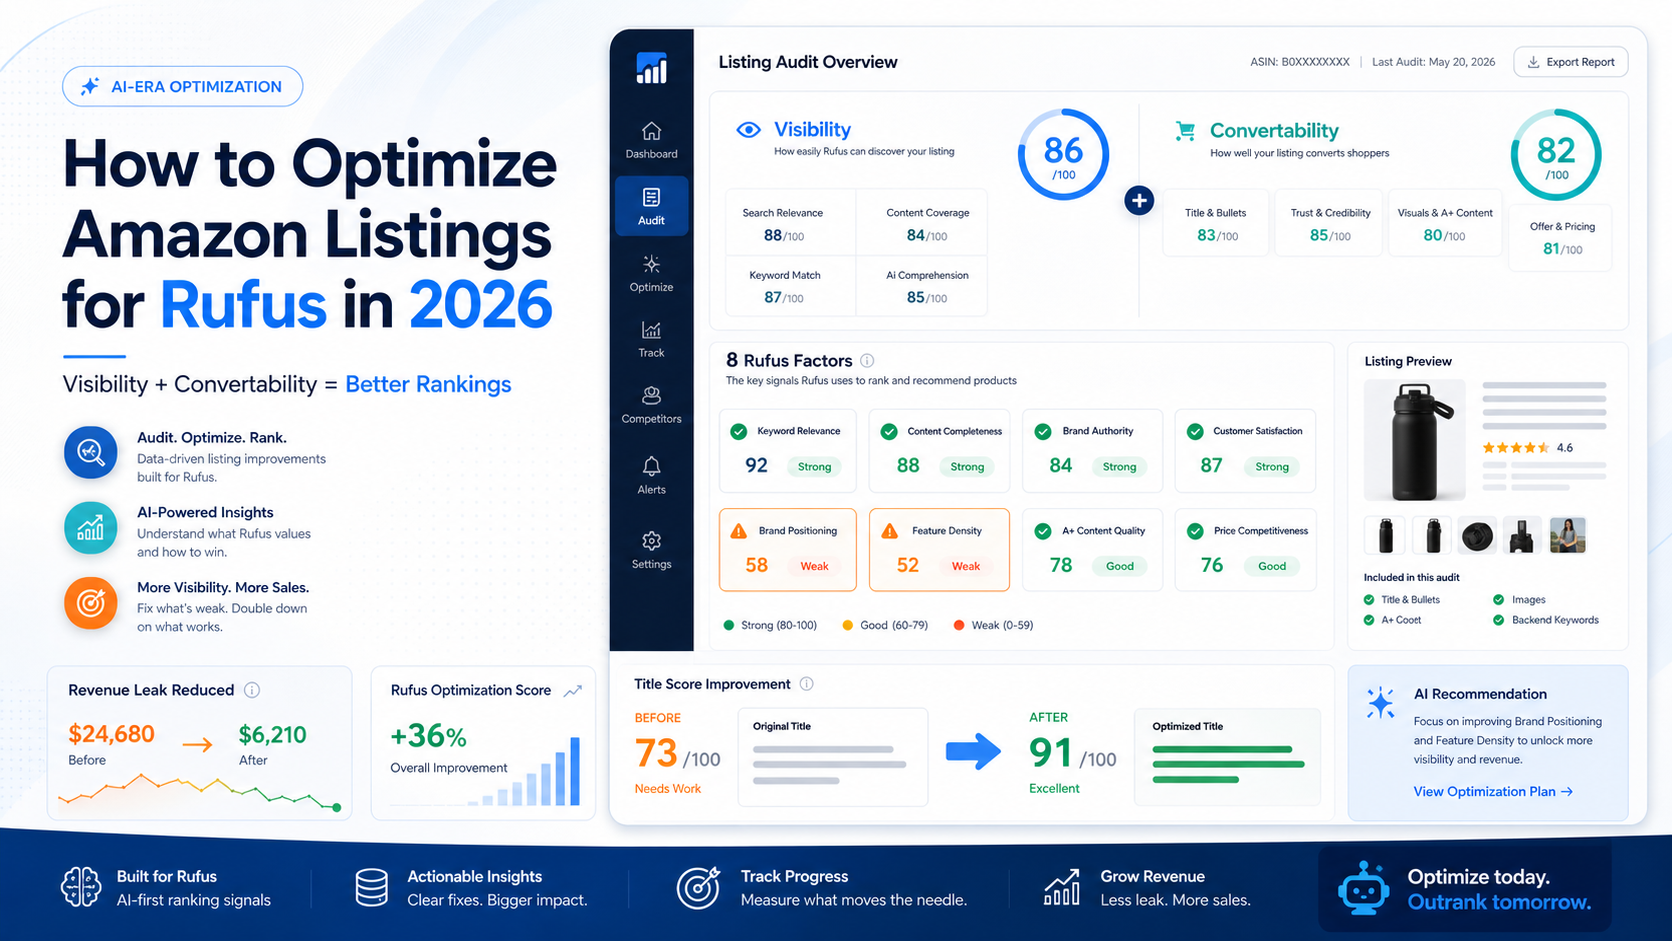
In our audits, the two most common failing factors on legacy listings are Brand Positioning and Feature Density. Both are things you can fix in an afternoon without a designer, a photographer, or a new product launch.
[SCREENSHOT: Three ASINs side by side in ListPilot with factor scores, the weakest factor highlighted on each. Alt text: “Three Amazon listings scored against the 8 Rufus factors with the weakest factor on each highlighted.”]
Step 3: Fix the Title First
The title is where you get the biggest and fastest win, for three reasons.
One. Titles are the single piece of content Rufus and A9 both read most heavily. Lift the title and you lift both layers at once.
Two. Titles are 200 characters. That’s a constrained surface, which means there are a finite number of decisions to get right. It’s the opposite of A+ content, where you can spin forever.
Three. Titles are one Seller Central edit. No new imagery, no designer cycles, no brand approval queue.
The title rewrite usually looks like this. Move the brand to the front and pair it with a category claim. Replace the adjectives with specifications. Name the primary use case explicitly. End with the most specific differentiator.
I walk through the exact mechanics (and the Polaris 73 to 91 case study) in Amazon Title Optimization.
Step 4: Rewrite the Bullets for Rufus
Bullets are the second-largest lever. This is where Answer-Readiness and Feature Density live.
If your current bullets are all-caps pipe-separated keyword strings, Rufus can’t use them to answer a buyer question. Rewrite as clean declarative sentences. Each bullet should answer one shopper question the listing’s target buyer asks before buying.
Five bullets. Five questions. Each question gets the sentence that answers it. Put the specification inside the sentence, not after a pipe. Front-load the keyword, but in the context of a readable claim, not a stuffing attempt.
I get into the specifics in Amazon Bullet Points: Writing for Rufus, Not Just Buyers.
Step 5: Audit the Main Image
The main image is the second thing Rufus considers after text, and the first thing a shopper considers period.
Three things to check. First, does the main image clearly show the product on a pure white background, as Amazon requires? Second, does it show the product in the orientation and packaging a shopper would recognize? Third, if you overlaid the title on the image, would the two tell the same story?
This last check catches an enormous amount of Visual-Textual Coherence failure. A listing with a premium positioning claim in the title and a drop-shipped look in the main image is leaking trust.
For the rest of the image stack (infographics, scale shots, lifestyle, A+ hero), read Amazon Product Images That Drive Conversions.
Step 6: Upgrade the A+ Content
A+ content is where convertability lives. It’s also where most sellers skip or half-step.
In the Rufus era, A+ content matters more, not less. Rufus reads it. Shoppers scroll it when they’re in the consideration phase after Rufus has recommended you. A weak A+ section is where a consideration-stage shopper bounces back to a competitor.
The rule I use: every module should either answer a question your target shopper has, or establish a trust signal your category demands. Nothing decorative. Nothing generic.
I cover example teardowns of strong and weak A+ in Amazon A+ Content Examples That Actually Lift Conversion.
Step 7: Measure the Revenue Leak
Once you’ve reworked the title and bullets, you’ll see a revenue leak number. In ListPilot, this is the estimated share of conversions the listing was losing due to failing factors before the rewrite.
Track it. A good rewrite should close the leak by 30% to 60% on the factors you addressed. If the leak barely moves, you either didn’t actually address the factor, or the weakest factor wasn’t really the weakest.
In the Polaris case study, two factor fixes (Brand Positioning and Feature Density) closed enough of the leak to lift the title score from 73 to 91. The revenue leak became a quantifiable number the operator could take to forecasting.
Step 8: Let It Breathe for 14 Days
Don’t stack optimizations. Make your changes, let the listing re-index, and let Amazon’s ranking signals re-stabilize. Two weeks is the minimum honest window.
During this window, watch impressions, click-through rate, conversion rate, and revenue leak. If all four move in the right direction, you’ve validated the factor fix. If impressions and click-through lift but conversion sags, you fixed the visibility side without fixing the convertability side. If conversion lifts but impressions don’t, you fixed convertability without fixing visibility.
This is why the frame matters. Without it, you can’t diagnose what the data is telling you.
Step 9: Move to the Next Weakest Factor
After 14 days, re-score. Find the new weakest factor. Fix that one. Let it breathe. Repeat.
The discipline is one factor at a time. Sellers who try to fix four factors in one edit rarely learn anything, because they can’t attribute the lift. One factor per 14-day cycle is slower than it feels, but it compounds.
Step 10: Repeat Across Your Top ASINs
Once the first ASIN is running clean, move to the second. Then the third. Then expand.
Most sellers in our audits find that fixing the top three ASINs captures 60% to 80% of the catalog-wide optimization opportunity, because revenue is so concentrated. Don’t feel guilty about ignoring the long tail until the head is clean.
A Word on Tooling
You can do all ten steps with a spreadsheet, a coffee, and enough patience to learn each factor. Plenty of sellers do.
ListPilot exists because the factor scoring, the revenue leak estimation, and the before/after measurement are tedious to do by hand across a real catalog. If you want to skip to the audit and see what your listings score today, the free audit is at the end of this post.
Whichever way you go, the playbook is the same. Frame. Score. Fix the weakest. Measure. Repeat.
Get a Free ListPilot Audit of Your ASIN
Paste your listing into ListPilot and we’ll score it across all eight Rufus factors, surface your revenue leak, and show you exactly what to change. No credit card. No sales call.
Tahir Khan is the founder of ListPilot and previously the technical co-founder of ParkingSoft, a cloud-based parking software company acquired by T2Systems. He writes about Amazon listing optimization, AI-era ranking, and what seven-figure sellers are doing differently.
About
RockitSeller makes software for Amazon sellers who are done guessing – starting with ListPilot, which scores any listing against the signals that correlate strongest with how Amazon ranks today and rewrites what’s costing you sales.
Contact
+1(770) 857-3352
support@rockitseller.com